Showing posts with label finger food. Show all posts

Monday, March 5, 2012

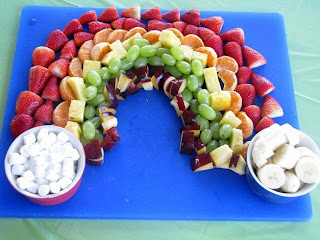
Under the Rainbow.


Ingredients

  • 3 x punnet s of strawberries - Halved
  • 3 mandarins - peeled and segmented
  • 100 g fresh pineapple - peeled and chopped
  • 1 kilo grapes - washed
  • 2 apple that have deep red skins - Cored and chopped
  • 100 grams - white mini marshmallows[ Koshar marshmallow brands are available]
  •  1 to 2 bananas - peeled and sliced 
Preparation
  1. Prepare the board that the rainbow is to be presented on.
  2. Working from the outside inwards lay out  2 rows of the halved strawberries in an arch shape.
  3. The place the mandarins, pineapple pieces, grapes and apples down in that order.
  4. To finish off place the banana pieces in one serving bowl and mini marshmallows in another.
  5. place these serving bowls at the base of the rainbow.


As part of a 'Rainbow theme'  this makes a great group fundraiser.  Especial when the 'Rainbow' theme involves interaction between the consumer the chosen piece of fruit and marshmallow for sale. Fondues are really good as an accessory to this fresh and healthy food.   If using the  fondue fundraising idea have available both a clean tooth picks or fondue utensils as well as a dirt utensil disposal area.

  • Encouraged to be written by Clear Vision Enterprises .. cve4me@gmail.com, twitter: cve4mejournal, LinkedIn : cve4me
Monday, February 13, 2012

Shark Head

Found this watermelon Shark Head on Google + and just had to try it out.  Made a few watermelon pops with the remainder of the second half of this water melon.

Ingredients
  • 1 watermelon.
  • 2 olives
  • 1/4 of two packets of gum lollies [we used ones shapes as people and another shaped as fish.]
Method
  1. Prepare the working area.
  2. Mark the middle length, on one side, of the water melon. [Mark A]
  3. Now on the other side mark up to 5cm [2in] below the first mark. [Mark B]
  4. Between these two points cut straight between. 
  5. Place aside the second half of the watermelon for later use.
  6. Sit in place the 'head ' on a board.
  7. Note where natural the tip of the watermelon is [Mark C]. It is this point that is the top gum area of the sharks mouth which will be marked for cutting after the eyes and before the fin.
  8.  From the tip [Mark C] to [Mark A] note half way down. It is at this level that the eyes slots will be cut [approx 1/4 diameter measurement from the mid top to bottom mid way line. Between Mark C and Mark A.]
  9.  Tracking a line on both sides from that would be level with the eyes on both sides to half way between the Mark A , Mark C and Mark B.  These two side line points are the join between the top and bottom lips. Refer to diagram inserted to work out where the top and bottom lip will be positioned at the front of the face.
  10. Within these lines peel away the external green out layer of skin. 
  11. Chop out the inner red watermelon into chunks as these are taken out. 
  12. The little bits put aside for a different recipe. 
  13. Cut out the teeth.
  14. Cut a slot up the mid line.
  15. Out of the second half of the watermelon cut a wedge like fin.  Insert the wedge into the slot.
  16. The eyes are held into the eye slot by tooth picks.
  17. As you put each layer of chilled watermelon pieces back into the large watermelon wedges into the head add a few lollies.
    1. Adding the lollies is best done just before the head is served up.
  18. Place more watermelon chunks and lollies around the plate the head is coming out of.
Similar Posts

  1. Palm Tree Pud
  2. Watermelon Cookies
  3. Pirates pie
  4. Melon Aid


Written by Clear Vision Enterprises .. cve4me@gmail.com, twitter: cve4mejournal, LinkedIn : cve4me

Saturday, January 21, 2012

Cream Cheese Sugar biscuits

Poka Dot sure had a great idea with this recipe.
Ingredients as per a ready made cookie dough.
 Try these ones


For the decoration use the following


Similar Posts

  1. Funny face biscuits
  2. Chocolate frosted cookies
  3. Chocolate Crunch cookies

Contact cve4me for ongoing reviews and updates.

References
The mothers huddle
The Curvy Carrot

Altered by by Clear Vision Enterprises .. cve4me@gmail.com, twitter: cve4mejournal, LinkedIn : cve4me

Wednesday, January 18, 2012

Apple Smiles

Ingredients
  • 5 medium red or green apples - cut into wedges
  • squeeze of a lemon
  • Peanut butter or other nut butter of your choice.
  • 315 g [10 oz] bag of mini-marshmallows.
Method
  1. Prepare work bench.
  2. Cut the apple into wedges.
    1. remove the pipes.
    2. Place the sides of the apple into a little lemon juice.
  3. Spread the nut butter on to one side of each wedge.
  4. Position the mini- marshmallows around the outside edge.
  5. Top the mouth with the other apple wedge.
  6. Press the skinny inside pieces of the apple together.
Normally an interesting natural snack. If you are going to use these smiles during Halloween the conside addin strawberry topping as fake blood.


Similar Posts

  1. Bleeding eye balls
  2. Purple Thumbs
  3. Bloody Popcorn.

Contact cve4me for ongoing reviews and updates.

References
Family Corner


Altered by Clear Vision Enterprises .. cve4me@gmail.com, twitter: cve4mejournal, LinkedIn : cve4me

Chocolate Marshmallow Slices


Ingrediants
  • 1/2 cup butter margarine
  • 1 pk. [375 g or 12 oz] chocolate buds [roughly 2 cups]
  • 1 pkt miniature marshmallows [330 g or 10 .5 oz] - coloured or plain.
  •  1 cup finely chopped nuts
  • Additional nuts
Methods
  1. melt the butter and chocolate buds over a low heat.
  2. Stir constantly until blended.
  3. remove from the heat.
  4. Cool 5 minutes.
  5. Stir in the Marshmallows and 1 cup of chopped nuts.
    1. Do not allow the marshmallows to melt.
  6. Tip the mix out onto waxed paper.
  7. Form 2 rolls [ careful this is hot]
  8. Wrap in foil.
  9. Refrigerate for 20 minutes.
  10. Remove from fridge and coat with with extra nuts.
  11. Cut rolls into 1 cm slices.


Similar Posts


Contact cve4me for ongoing reviews and updates.

References

Encouraged to be written by Clear Vision Enterprises .. cve4me@gmail.com, twitter: cve4mejournal, LinkedIn : cve4me

Marshmallow Dip Sticks

Ingredients

Easy to make... fast to eat.
  • 2 cups chocolate chips
  • 1 cup peanut butter, cashew butter or other nut spread
  • 300 g [10 oz] bag marshmallows
  • chocolate sprinkles
  • pretzel sticks
  • waxed paper
Method

  1. Set up the work bench.
    1. If thee are a team of smaller helpers then set the bowls of pretzels, marshmallows, nut paste, melted chocolate and sprinkles far enough apart for ease of movement between each person. 
      1. By the way with helpers forget the waxed paper.
  2. Insert pretzel sticks into the marshmallows.
    1. about 3/4 down into the Marshmallow.
  3. Dip the top of the Marshmallow into the nut butter.
  4. Set aside on the waxed paper.
  5. Melt the Chocolate chips in a microwave, stove top or double boiler.
  6. Dip peanut butter end of the marshmallow into the chocolate.
  7. Immediately dip the chocolate end into chocolate sprinkles.
  8. Place on waxed paper.


Similar Posts

  1. Raisin and Nut spread

Contact cve4me for ongoing reviews and updates.


References
Family Corner


Altered by Clear Vision Enterprises .. cve4me@gmail.com, twitter: cve4mejournal, LinkedIn : cve4me

Spider Bites

Cute as this spider is eating him could be a culinary transformation.

Ingredients
Per person
  • 1 x mini Babybel cheese.
  • 4 small Pretzel Sticks
  • 2 raisins
Method.

  1. Unwrap all the cheeses.
  2. Make two tiny slits in the top of the Cheese's.
  3. Place one of the 2 allocated raisins in each slit.
  4. Now halve the pretzels sticks.
  5. Place 4 of these halves along each side of the Babybel cheese.


Similar Posts


Contact cve4me for ongoing reviews and updates.

References
Recipe originally published in Wondertime magazine.
Kaboose


Altered by Clear Vision Enterprises .. cve4me@gmail.com, twitter: cve4mejournal, LinkedIn : cve4me

Tuesday, January 17, 2012

Watermelon cookies

This one is the watermelon.
Other colours for other fruits

Ingredients

  • 2 cups of self raising flour [all purpose]
  • 1 and a 1/2 tsp baking powder
  • 1/2 tsp salt
  • 1/3 cup butter
  • 1/2 cup shortening
  • 3/4 cup sugar
  • 1 egg
  • 1 tbsp milk
  • 1 tsp vanilla essence
  • 3 drop of red food colouring or beetroot juice
Method
  1. Combine the flour, baking powder and salt into a small bowl.
  2. Beat the butter and shortening until light and fluffy.
  3. Gradually add the sugar while beating this well in.
  4. Stir in the egg, milk and vanilla.
  5. Gradually add the flour mixture to the creamed mixture.
  6. Mix well.
  7. Add a small amount of either food colouring or beetroot juice.
  8. Beat til blended.
  9. Shape the dough into a ball.
  10. Cover.
  11. Chill for three hours.
  12. Preheat over to 190 deg C [375 Deg F]
  13. Divide the dough in half keeping one portion in the fridge.
  14. Roll the first portion out to 5 mm [1/4 inch].
    1. Use a lightly floured board or the mixture becomes unusable.
  15. Cut the dough with 8 cm [3 inch] round cookie cutter. 
    1. then cut each circular piece in half.
  16. Place on ungreased cooking sheet.
  17. Press several chocolate chips into each cookie.  
  18. Repeat the process.
  19. When cooked and cooled then ice or add the frosting by dipping the outside of the circular edge into the frosting and move it around to the other edge.
  20. Place the watermelon biscuit on a baking sheet until frosting is hard.


Similar Posts

  1. Juicing the watermelon
  2. Zappy Watermelon Cooler
  3. Watermelon Salad with Feta and Mint
  4. Frosting recipe

Contact cve4me for ongoing reviews and updates.

References
Encouraged to be written by Clear Vision Enterprises .. cve4me@gmail.com, twitter: cve4mejournal, LinkedIn : cve4me

Message on a biscuit

Simple steps great learning make.

Part of the fun with food is that the preparation  all about messages. Even young children enjoy making simple messages look creative when dealing with their emotions.

Try these and see what I mean.

Ingredients
Per child you will need
  • Either a Graham cracker or Marie biscuit.
  • Pink icing or frosting [ white icing sugar or frosting with a little red added.  Little = very little]
  • Little cake decoration balls.
  • Alpha Bits or cake decoration hearts.
Method
  1. Frost or ice the biscuits
  2. Using the cake decoration balls write a message [try I love you, happy birthday, Merry Christmas or even be my Valentine]
  3. Now decorate the edges with hearts or candle.  What ever the occasion warrants that you have the cake decoration bits for.


Similar Posts

  1. Funny Face biscuits
  2. Why create an edible face
  3. Fudge frosting

Contact cve4me for ongoing reviews and updates.

References

Monday, January 16, 2012

Asian Pear Pizza

This one is family sized.
Many people may think that a fruit pizza is a strange thing to have in a children's cooking area.  However one of the things with education and children is that children are usually more open to variations in recipes and food from different cultures than adults.  There fore when adults support what could be a healthy diet extra then children will follow suit.  Especially when that same recipe for a big family size pizza is made into child size portions from the beginning.  Making child size portions does take extra dough  though.


Ingredients

  • Cover the work area first.
  • One amount of pizza dough.
  • 2 to 3 Asian Pears - cored and very thinly sliced. [better a more experienced knife handling person do this section] let the slices drain off for a short while.
  • 120 gr [1/8 lb] of Pancetta (bacon) -cooked until crisp and drained on paper towels.
  • 50 g [2 to 3 oz] of Gorgonzola cheese - crumbled.
  • 90 g [ 4 oz] Mozarella cheese - shredded.
  • freshly ground black pepper to taste.
Method
  1. Preheat oven to 220 deg C [425 deg F].
  2. Roll out the dough into pieces that are child size. 
    1.  I have found the best measurement was from the wrist to the large finger tip.  These may be square or round in shape.  Usually depends on how many children you are cooking for at one time.
  3. Pre cook the dough so that the dough is not soggy when the children eat this pizza.
    1. Cool this pizza base so that there is less heat for the children to work over.  Also cooler base has the actual oven heat melting the cheeses when placed into the oven again for cooking.
  4. Starting from the outside work around the edges and towards the middle covering the Pizza shape with the slices of the Asian Pear.
  5.  Since the Pancetta , as well as the Gorgonzola cheese, is relatively strong in flavour go easy on these as they are crumbled onto the top.
  6. A sprinkling of shredded Mozarella will hold everything together.
  7. bake until the centre has melted completely.
  8. Remove from heat and cool.
  9. Slice and enjoy 


Similar Posts

Contact cve4me for ongoing reviews and updates.

References


Unique and delicious

Encouraged to be written by Clear Vision Enterprises .. cve4me@gmail.com, twitter: cve4mejournal, LinkedIn : cve4me

Marshmallow bunnies


A few years ago a friend made some children I know bunnies similar to these.    The children enjoyed receiving them. A major challenge with these bunnies was to then get the children eating them.  Most thought that they wanted to save them for later. Sometimes they actually got the bunnies home.  Other times there was no way that was going to happen.

Ingredients

  • Marshmallows.
  • Scissors
  • Tooth pick
  • Food Colouring
  • A little icing sugar if needed.
Method


  1. Hold the marshmallow in your fingers so that while you are using the scissors the Marshmallow will have less chance of moving.
  2. To make the ears:
    1. Using the scissors make a diagonal cut towards the rim edge of the Marshmallow .
    2. Stop before you get too near the top end of the Marshmallow.
    3. Gently lift the corner that you have snipped.
    4. Now snip along the middle of this piece. 
    5. Rub a little of icing sugar between your fingers.
    6. Separate the ears and angle them both outwards.
  3. To make the tail.
    1. Starting at the point of the first cut you made for the ears.
    2. Snip down towards the back [away from the face direction] until you are about half way down the back of the Marshmallow. 
    3. Pinch the end of this segment so that a cute little tail is made.
  4. For the bunnies face [ and feet]
    1. Starting about midway between the face and the where the front feet will be - snip about 0.7 cm [1/4 inch] towards the middle /bottom part of the body.
    2. The upper side of the cut has become the lower jaw line of the face.
    3. Snip the flap of the marshmallow in half. 
      1. There are you two front feet.
  5. Using a toothpick and a little food colouring - dip the end of the tooth pick into the dye.
    1.  'Paint' a face on the bunny.

Similar Posts


Contact cve4me for ongoing reviews and updates.

References


Fluffier Bunnies

Altered by Clear Vision Enterprises .. cve4me@gmail.com, twitter: cve4mejournal, LinkedIn : cve4me

Edible Jelly Bean Basket of goodies.

As a gift or as part of a place setting these cup cakes are glorious fun to make.   Made in a two part basis the older children make up the cupcakes.  Once these are all cold to touch the next step begins. 

Ingredients
  • 12 cupcakes - in the paper jackets they are baked with.
  • 2 cups white icing
  • 12 pieces of red or black licorice.[ about the sized of a pipe cleaner in width]
  • Sweetened coconut - coloured green with green food coloring.
  • 1 bag jelly beans
  • 1 small amount of M & M's
  • 1 x small amount of silver or gold marzipan cake decorating shapes.
  • 12 ribbons
Method 
  1. Place a cover on the creating area.
  2. Place a drop of green colouring [if using it] into a bowl. 
    1. Place the shredded coconut in the bowl.
    2. Cover with cling wrap or seal the container.
    3. Shake the coconut around in this colouring.
    4. Take out the coconut and 'towel' the excess moisture off the coconut.
  3. Ice the cupcakes first.
    1. If using a  icing pipe try to layer the icing around the edges just a little.
  4. Place both ends of the licorice into the cupcake.  Slide the ends down the side of the cup cake to the bottom.
  5. On top of the icing mixture place a small amount of dry green coconut.
  6. Place three jelly beans into the shredded coconut.
  7. Add a few of the M& M's and Cake decoration pieces. 
    1. Less is best in this cake decorating exercise.
    2. Gently press the smaller pieces a little down into the green coconut.  A gentle pressure allows the icing sugar to be taken up and possibly stick the lollies onto the coconut.
  8. Tie a small ribbon on the licorice.


Similar Posts

  1. Fudge frosting

Contact cve4me for ongoing reviews and updates.

References


Edible Easter Basket Cupcakes


Altered by Clear Vision Enterprises .. cve4me@gmail.com, twitter: cve4mejournal, LinkedIn : cve4me

Palm Tree pud

Although this base is in a 'tub' it may also be served in a pudding bowl.  The trick is to make a thick base  [say custard] the day before and set in the fridge. Very easy on the eye.  A load of fun to eat.


Ingredients

Palm tree on deserted island
  • 1 tub of children's yoghurt or pudding -with some of the contents removed.
  • Marie biscuits -crushed
  • 11 per cup of Chocolate covered biscuit fingers.
  • Icing sugar [thick] or melted chocolate bud.
  • Sour or fruit strap.
  • Brown M & Ms


Method


  1. Cover the work area.
  2. Place a little of the Marie biscuits on the top of the yoghurt or pudding. [You have just created the sand]
  3. At this point either 
    1. Melt the chocolate button 
    2. or make the icing mix.
  4. Along the length of the fruit strap or sour strap. Then make these into 8 cm [3 in] lengths.
  5. Turn the end upside down and place of the joined.
  6. Join these pieces together with the Melted chocolate or icing sugar.
  7. Onto one of the ends of the Chocolate Coated finger take a dab of icing sugar or chocolate mix.
  8. Place two brown M & Ms near what will be the top end of the tree.
  9. Now place both the stick and the 'palm leaves' together.  
  10. Wait for the chocolate or icing mix to set.
  11. Carefully turn the tree up the other way.
  12. Place the base of the tree in through the 'sand'.
  13. Add a few more brown M & M's on the sand.


Similar Posts

  1. Making a decent Yoghurt
  2. Banana Boat

Contact cve4me for ongoing reviews and updates.

References
The ramblings of a crazy women

Encouraged to be written by Clear Vision Enterprises .. cve4me@gmail.com, twitter: cve4mejournal, LinkedIn : cve4me

Monday, December 19, 2011

Chocolate and Banana Cresents

From the early preparation to the eating these chocolate and banana crescents are ideal to adventure with as a team - with only your children participating or the added of friends that have descended into your back door for the day..  Small groups doing different things, supervised by more than one adult makes the creations a living experience.

However the crescents are prepared the end taste is light weight and enjoyable.  Eaten when light a fluffy having cooled down a little with topping such as home made yoghurt they are still very tasty when served chilled as a finger food dessert.

Makes 10


  • 3/4 cup of milk
  • 1/2 medium banana - very finely chopped.
  • 1/4 cup dark brown chocolate bits.
  • 1/4 cup brown sugar
  • 1/2 tsp ground cinnamon
  • 2 cups self raising flour
  • pinch of baking powder
  • 2 tbsp caster sugar
  • milk, for extra, for glazing.
  • cinnamon sugar - for sprinkling.


  1. Mix the banana, chocolate bits, brown sugar and ground cinnamon.
    1. Set this aside, cover the bowl and allow the mixture to 'age'.
    2. Line a baking try and turn on the oven to heat it up. 200 deg C is the cooking temp.
  2. Sift the flour, baking powder and castor sugar together.
  3. Rub the butter into sifted dry ingredients, until the mixture resembles fine like breadcrumbs.
  4. Make a well into the centre.
  5. Add most of the milk.
  6. Mix lightly to form a soft dough.
    • Add the remaining milk if necessary.
  7. Turn onto a lightly floured surface.
  8. Knead briefly until smooth.
  9. Roll out the dough to form a large circle
    • About 30 cm [12 inches] round.
  10. Cut the dough into ten even-sized wedges.
    • You will be rolling up each base piece from the widest end so take the time now to position the wedges so that as you are rolling the wedges up the base and the contents are not 'flopping' over the other pieces of 'base'.. 
  11. With the mixture of the banana, chocolate bits, brown sugar and ground cinnamon place a small amount at the widest end of each of the wedges. 
  12. Enclose the filling as you begin to roll the widest side of the wedge in towards the apex.
  13. Place these crescents onto your lined baking tray.
  14. Brush the crescent top with milk.
  15. Sprinkle a little cinnamon sugar on top of each crescent.
  16. bake in the upper half of the oven at 200deg C for about 15 minutes [less if oven is fan forced] - or until golden brown.
  17. Top with thickened cream ,ice cream, home made custard or even yoghurt.
  18. Serve immediately.


Similar Posts


Contact cve4me for ongoing reviews and updates.  Google + it to me too.


References

Monday, August 15, 2011

Hairball Salad with Saliva Dressing


Ingredients:
  • 1 lg Ripe avocado
  • 2 c Alfalfa sprouts
  • 5 lg To 6 carrots, washed peeled and grated
  • Italian dressing

Tools:

  • Paring knife
  • Spoon
  • Mixing bowl
  • Fork
  • Carrot peeler
  • Grater
  • 4 Salad bowls
Method

  1. With an adults help, cut avocado in half. Use a spoon to scoop out the pit.
  2. Scoop avocado out of the shell and put in the bowl. Add sprouts to the avocado meat. Mash with a fork. It is ok to leave some lumps. 
  3. Set the mixture aside.
  4. Divide the grated carrots among the four salad bowls.
  5. Using your clean fingers and a spoon, make walnut size hairballs from the avocado mixture and arrange them on top of the grated carrots. 
  6. Pour Italian "saliva" dressing over hairballs and serve. 
  7. Serves 4 cat fanciers.

Serving suggestion: Squeeze ribbons of chocolate icing "hairball" medicine out of a paper cone onto the backs of your guests hands to be licked off for dessert.


Similar posts

  1. Bleeding eye balls
  2. Purple Thumbs
  3. Bloody Popcorn.
  4. Apple smiles


Altered by Clear Vision Enterprises .. cve4me@gmail.com, twitter: cve4mejournal, LinkedIn : cve4me

Saturday, August 13, 2011

Peanut Butter Caterpillars


  • Image for Edible Halloween Crawlies DIY Craft Project


Note: Where peanut butter is used in these recipes for "gluing" edible body parts together, frostings may be used as a substitution for those children who are sensitive to or allergic to nuts.


  • bananas
  • peanut butter
  • grapes
  • chow mein noodles

  1. Peel and slice a banana.
  2.  Join the slices together by "gluing" them with peanut butter. 
  3. Carefully poke two chow mein noodles (or break a pretzel stick in half to make two pieces) through the top of the grape.
  4.  Use more peanut butter to attach the head (grape) to the front of the body, with antennae (chow mein noodles) pointing up.


Encouraged to be written by Clear Vision Enterprises .. cve4me@gmail.com, twitter: cve4mejournal, LinkedIn : cve4me

Friday, August 12, 2011

Honey Biscuits

Ingredients

  • 175 g unsalted butter - chopped
  • 1 cup caster sugar
  • /4 cup honey
  • 1/4 tsp ground cinnamon
  • 1 egg - lightly beaten.
  • 1 tsp vanilla extract
  • 2  1/4 cups self - raising flour
  • milk to serve -optional.
Directions
  1. Stir butter, sugar, honey and cinnamon in a medium sauce pan over a low heat - tiol butter has melted and mixture is smooth.
  2. Remove from heat.
  3. transfer the hot mix to a large bowl.
  4. Cool to room temperature.
  5. Stir egg, vanilla extract and flour into mixture.
  6. Roll tbsp of mixture into balls
  7. Place, about 4 cm apart, on two oven trays lined with baking paper.
  8. Flatten slightly with a fork.
  9. Cook in two batches, in a moderate oven 9180 deg C for 12 min [until golden brown]
  10. Cool on trays
  11. Serve biscuits with milk.


Encouraged to be written by Clear Vision Enterprises .. cve4me@gmail.com, twitter: cve4mejournal, LinkedIn : cve4me

Cinnamon Teddy Bears


Ingredients

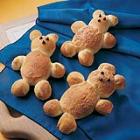
  • Teddy Bear Biscuits Recipe
  • 1 mix of  buttermilk biscuits
  • 2 tablespoons sugar
  • 1 egg, beaten
  • 1/4 teaspoon ground cinnamon
  • 9 miniature semisweet chocolate chips

Directions

  1. For each bear, shape one biscuit into an oval for the body and place on a greased baking sheet.
  2.  Cut one biscuit into four pieces; shape into balls for arms and legs. 
  3. Place next to body.
  4.  Cut one biscuit into two small pieces and one large pieces; shape into head and ears and place above body. 
  5. Brush with egg.
  6.  Combine sugar and cinnamon; sprinkle over bears. 
  7. Bake at 425 degrees F for 8-10 minutes (the one remaining biscuit can be baked with the bears).
  8.  Place chocolate chips on head for eyes and nose while the biscuits are still warm.


Encouraged to be written by Clear Vision Enterprises .. cve4me@gmail.com, twitter: cve4mejournal, LinkedIn : cve4me

Teddy Bear Biscuits

Ingredients:

  • 250g unsalted butter - at room temperature, chopped.
  • 1 cup caster sugar
  • 2 eggs
  • 2/3 cup desiccated coconut
  • 3 cup self-raising flour
  • 2 tbsp cocoa power, sifted
  • 1/4 cup dark chocolate melts, melted
  • Mini M&M's to decorate with.
Directions
  1. Beat butter and sugar until light and fluffy.
  2. Add eggs 
    1.  one at a time- 
    2. beat until combined.
  3. Stir in coconut and flour to form a smooth dough.
  4. Divide dough in half.
  5. Add chocolate powder to one half of the dough mixture..
    1. knead until chocolate is mixed through.
  6. To make bear heads 
    1. roll 14 level tbsp of chocolate dough into balls.
    2. place 6 cm apart on the oven trays.
    3. Using your hands gently push the heads sown to flatten the balls slightly.
  7. To make bear bodies 
    1. Press down gently to flatten bodies.Chocolate Teddy Bear Cookies
    2. roll 14 level tbap of chocolate dough into balls.
    3. Place against heads.
  8. To make arms and legs
    1. Roll 56 level tsp into balls.
    2. Place against bodies.
    3. press to flatten slightly.
  9. To make ears
    1. Roll 28 level tsp into balls.
    2. Place against he head .
  10. Cook biscuits one tray at the time.
    1. moderate oven [180 deg Cel] for about 15 to 20 minutes.
  11. Cool bears on tray.
  12. Decorate
    1. Pour dark chocolate into a small snap lock bag.
      1. squeeze into one courner, twist bag and make a small snip.
      2. Attach mini M&M's with melted chocolate to represent the eyes.
      3. Pipe on choclate nose and mout.
  13. Put aside to set.
  14. Biscuits can be made up to three days before ifr they are stored in an air tight container.


Encouraged to be written by Clear Vision Enterprises .. cve4me@gmail.com, twitter: cve4mejournal, LinkedIn : cve4me