Showing posts with label easy to cook. Show all posts

Thursday, January 19, 2012

Heart felt apple pies


Ingredients

  • 4 pastry sheets
  • 1 x 400g can of apple pieces [for cooking]
  • Dash of cinnamon or nutmeg mixed with a little sugar.
  • a little milk or water.
Method


  1. Prepare the work area first.
  2. Preheat the oven to 220 Deg C [ 425 deg F].
  3. Spray the baking sheet or cooking tray.
  4. Mix the cinnamon / nutmeg and sugar into the apple mix.
  5. For each apple pie two pieces of heart shaped pastry cut out are used.
  6. On the base one place 1 to 2 tbsp of apple mix.
  7. around the edges run a finger that has the milk or water on it slightly dampening the outside edge.
  8. place the upper pastry over the top of the apple.
  9. Press the edges of the top and bottom pastry pieces together.
  10. Use a fork to crinkle press the edges together  as well as to make a couple of holes in the top.
    1. allows the steam to escape.
  11. Bake for 10 to fifteen minutes - or until golden brown.
  12. Allow to cool before biting into these pies.


Similar Posts

  1. Spiced Apple Juice
  2. Baked apples with mint
  3. Cut out the heart shape

Contact cve4me for ongoing reviews and updates.

References
Valentine Apple Pies


Altered  by Clear Vision Enterprises .. cve4me@gmail.com, twitter: cve4mejournal, LinkedIn : cve4me

Wednesday, January 18, 2012

Heart in the hole eggs and toast

Simple to do but much appreciated.
Sometimes its having a combination of creatively and desperation that enables really simple ideas to come forward.  The amount of team work is levelled at the child's ability level.

Ingredients

  • 1 tsp butter or margarine.
  • 1 slice of bread
  • 1 egg.

Method

  1. Prepare the work area.
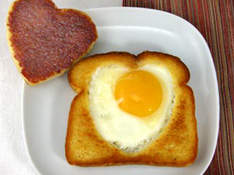
  2. Using a 8 cm [3 inch] heart shaped cutter cut out a heart in the slice of bread.
    1. Centre usually works best.
  3. Crack an egg into a small cup and set this aside.
  4. Heat the butter or margarine in a fry pan.
  5. Place both pieces of the bread into the fry pan.
  6. Cook about two minutes on the first of the sides.
  7. Turn both pieces over.
  8. Place the egg into the heart shaped hole .
  9. Some people like their eggs over easy. If this is the case for you then add the egg when you are cooking the flip side of the bread.  Should you want the egg cooked thoroughly then add the egg when you are cooking the first side.  Choice is yours.
  10. I like to present this with the cut out shape on top of the heart shaped egg.


Similar Posts


Contact cve4me for ongoing reviews and updates.

References
Kabose.com

Altered by Clear Vision Enterprises .. cve4me@gmail.com, twitter: cve4mejournal, LinkedIn : cve4me

Monday, January 16, 2012

Chocolate dipped fruit

Microwaving the chocolate is a lot easier than double boiler method when there are plenty of children around.
The main thing to be weary of is overdoing the melting process.


Ingredients

  • 400 grams [14.5 oz] bag of dried fruit pieces
    •  These may be in the form of Dried mango, peach, guava, pineapple, apple or even banana chips.
  • about 1/3 rd a cup of dark chocolate drops.
  • about 1/3rd a cup of white chocolate drops.
Method


  1. Cover the work area first.  Lay down some grease proof paper.
  2. Into a microwave bowl place the white or brown chocolate pieces
  3. Melt the chocolate for 30 seconds .
  4. Stir.
  5. Melt again.
  6. Stir...
  7. When the Chocolate has melted enough dip the fruit pieces into the chocolate.
    1. Best done with a small pair of tongs or the children's fingers may find the chocolate hot to touch.
  8. Lay each piece of fruit out onto the wax paper.
  9. Allow to set.
  10. Use cellophane to wrap each piece up with.
  11. Place each piece into what ever you are going to use as a gift basket.


Similar Posts


Contact cve4me for ongoing reviews and updates.

References

Encouraged to be written by Clear Vision Enterprises .. cve4me@gmail.com, twitter: cve4mejournal, LinkedIn : cve4me

Marshmallow bunnies


A few years ago a friend made some children I know bunnies similar to these.    The children enjoyed receiving them. A major challenge with these bunnies was to then get the children eating them.  Most thought that they wanted to save them for later. Sometimes they actually got the bunnies home.  Other times there was no way that was going to happen.

Ingredients

  • Marshmallows.
  • Scissors
  • Tooth pick
  • Food Colouring
  • A little icing sugar if needed.
Method


  1. Hold the marshmallow in your fingers so that while you are using the scissors the Marshmallow will have less chance of moving.
  2. To make the ears:
    1. Using the scissors make a diagonal cut towards the rim edge of the Marshmallow .
    2. Stop before you get too near the top end of the Marshmallow.
    3. Gently lift the corner that you have snipped.
    4. Now snip along the middle of this piece. 
    5. Rub a little of icing sugar between your fingers.
    6. Separate the ears and angle them both outwards.
  3. To make the tail.
    1. Starting at the point of the first cut you made for the ears.
    2. Snip down towards the back [away from the face direction] until you are about half way down the back of the Marshmallow. 
    3. Pinch the end of this segment so that a cute little tail is made.
  4. For the bunnies face [ and feet]
    1. Starting about midway between the face and the where the front feet will be - snip about 0.7 cm [1/4 inch] towards the middle /bottom part of the body.
    2. The upper side of the cut has become the lower jaw line of the face.
    3. Snip the flap of the marshmallow in half. 
      1. There are you two front feet.
  5. Using a toothpick and a little food colouring - dip the end of the tooth pick into the dye.
    1.  'Paint' a face on the bunny.

Similar Posts


Contact cve4me for ongoing reviews and updates.

References


Fluffier Bunnies

Altered by Clear Vision Enterprises .. cve4me@gmail.com, twitter: cve4mejournal, LinkedIn : cve4me

Palm Tree pud

Although this base is in a 'tub' it may also be served in a pudding bowl.  The trick is to make a thick base  [say custard] the day before and set in the fridge. Very easy on the eye.  A load of fun to eat.


Ingredients

Palm tree on deserted island
  • 1 tub of children's yoghurt or pudding -with some of the contents removed.
  • Marie biscuits -crushed
  • 11 per cup of Chocolate covered biscuit fingers.
  • Icing sugar [thick] or melted chocolate bud.
  • Sour or fruit strap.
  • Brown M & Ms


Method


  1. Cover the work area.
  2. Place a little of the Marie biscuits on the top of the yoghurt or pudding. [You have just created the sand]
  3. At this point either 
    1. Melt the chocolate button 
    2. or make the icing mix.
  4. Along the length of the fruit strap or sour strap. Then make these into 8 cm [3 in] lengths.
  5. Turn the end upside down and place of the joined.
  6. Join these pieces together with the Melted chocolate or icing sugar.
  7. Onto one of the ends of the Chocolate Coated finger take a dab of icing sugar or chocolate mix.
  8. Place two brown M & Ms near what will be the top end of the tree.
  9. Now place both the stick and the 'palm leaves' together.  
  10. Wait for the chocolate or icing mix to set.
  11. Carefully turn the tree up the other way.
  12. Place the base of the tree in through the 'sand'.
  13. Add a few more brown M & M's on the sand.


Similar Posts

  1. Making a decent Yoghurt
  2. Banana Boat

Contact cve4me for ongoing reviews and updates.

References
The ramblings of a crazy women

Encouraged to be written by Clear Vision Enterprises .. cve4me@gmail.com, twitter: cve4mejournal, LinkedIn : cve4me

Monday, December 19, 2011

Chocolate and Banana Cresents

From the early preparation to the eating these chocolate and banana crescents are ideal to adventure with as a team - with only your children participating or the added of friends that have descended into your back door for the day..  Small groups doing different things, supervised by more than one adult makes the creations a living experience.

However the crescents are prepared the end taste is light weight and enjoyable.  Eaten when light a fluffy having cooled down a little with topping such as home made yoghurt they are still very tasty when served chilled as a finger food dessert.

Makes 10


  • 3/4 cup of milk
  • 1/2 medium banana - very finely chopped.
  • 1/4 cup dark brown chocolate bits.
  • 1/4 cup brown sugar
  • 1/2 tsp ground cinnamon
  • 2 cups self raising flour
  • pinch of baking powder
  • 2 tbsp caster sugar
  • milk, for extra, for glazing.
  • cinnamon sugar - for sprinkling.


  1. Mix the banana, chocolate bits, brown sugar and ground cinnamon.
    1. Set this aside, cover the bowl and allow the mixture to 'age'.
    2. Line a baking try and turn on the oven to heat it up. 200 deg C is the cooking temp.
  2. Sift the flour, baking powder and castor sugar together.
  3. Rub the butter into sifted dry ingredients, until the mixture resembles fine like breadcrumbs.
  4. Make a well into the centre.
  5. Add most of the milk.
  6. Mix lightly to form a soft dough.
    • Add the remaining milk if necessary.
  7. Turn onto a lightly floured surface.
  8. Knead briefly until smooth.
  9. Roll out the dough to form a large circle
    • About 30 cm [12 inches] round.
  10. Cut the dough into ten even-sized wedges.
    • You will be rolling up each base piece from the widest end so take the time now to position the wedges so that as you are rolling the wedges up the base and the contents are not 'flopping' over the other pieces of 'base'.. 
  11. With the mixture of the banana, chocolate bits, brown sugar and ground cinnamon place a small amount at the widest end of each of the wedges. 
  12. Enclose the filling as you begin to roll the widest side of the wedge in towards the apex.
  13. Place these crescents onto your lined baking tray.
  14. Brush the crescent top with milk.
  15. Sprinkle a little cinnamon sugar on top of each crescent.
  16. bake in the upper half of the oven at 200deg C for about 15 minutes [less if oven is fan forced] - or until golden brown.
  17. Top with thickened cream ,ice cream, home made custard or even yoghurt.
  18. Serve immediately.


Similar Posts


Contact cve4me for ongoing reviews and updates.  Google + it to me too.


References

Friday, August 12, 2011

Cinnamon Teddy Bears


Ingredients

  • Teddy Bear Biscuits Recipe
  • 1 mix of  buttermilk biscuits
  • 2 tablespoons sugar
  • 1 egg, beaten
  • 1/4 teaspoon ground cinnamon
  • 9 miniature semisweet chocolate chips

Directions

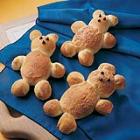
  1. For each bear, shape one biscuit into an oval for the body and place on a greased baking sheet.
  2.  Cut one biscuit into four pieces; shape into balls for arms and legs. 
  3. Place next to body.
  4.  Cut one biscuit into two small pieces and one large pieces; shape into head and ears and place above body. 
  5. Brush with egg.
  6.  Combine sugar and cinnamon; sprinkle over bears. 
  7. Bake at 425 degrees F for 8-10 minutes (the one remaining biscuit can be baked with the bears).
  8.  Place chocolate chips on head for eyes and nose while the biscuits are still warm.


Encouraged to be written by Clear Vision Enterprises .. cve4me@gmail.com, twitter: cve4mejournal, LinkedIn : cve4me
Teddy Bear Biscuits

Ingredients:

  • 250g unsalted butter - at room temperature, chopped.
  • 1 cup caster sugar
  • 2 eggs
  • 2/3 cup desiccated coconut
  • 3 cup self-raising flour
  • 2 tbsp cocoa power, sifted
  • 1/4 cup dark chocolate melts, melted
  • Mini M&M's to decorate with.
Directions
  1. Beat butter and sugar until light and fluffy.
  2. Add eggs 
    1.  one at a time- 
    2. beat until combined.
  3. Stir in coconut and flour to form a smooth dough.
  4. Divide dough in half.
  5. Add chocolate powder to one half of the dough mixture..
    1. knead until chocolate is mixed through.
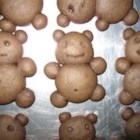
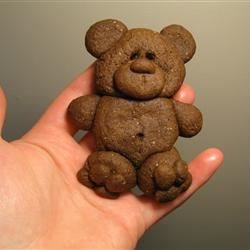
  6. To make bear heads 
    1. roll 14 level tbsp of chocolate dough into balls.
    2. place 6 cm apart on the oven trays.
    3. Using your hands gently push the heads sown to flatten the balls slightly.
  7. To make bear bodies 
    1. Press down gently to flatten bodies.Chocolate Teddy Bear Cookies
    2. roll 14 level tbap of chocolate dough into balls.
    3. Place against heads.
  8. To make arms and legs
    1. Roll 56 level tsp into balls.
    2. Place against bodies.
    3. press to flatten slightly.
  9. To make ears
    1. Roll 28 level tsp into balls.
    2. Place against he head .
  10. Cook biscuits one tray at the time.
    1. moderate oven [180 deg Cel] for about 15 to 20 minutes.
  11. Cool bears on tray.
  12. Decorate
    1. Pour dark chocolate into a small snap lock bag.
      1. squeeze into one courner, twist bag and make a small snip.
      2. Attach mini M&M's with melted chocolate to represent the eyes.
      3. Pipe on choclate nose and mout.
  13. Put aside to set.
  14. Biscuits can be made up to three days before ifr they are stored in an air tight container.


Encouraged to be written by Clear Vision Enterprises .. cve4me@gmail.com, twitter: cve4mejournal, LinkedIn : cve4me